Jenkins complete CI/CD


Complete CI/CD of a Java Application using Jenkins, Nexus, Sonarqube, AWS and Docker
Prerequisites:
AWS Account
GitHub account
Jenkins
Nexus
SonarQube
Slack
Create Key-pair
- Create a key pair and download the private key to your local system. Remember where you downloaded your key because you will need this key to ssh our servers.
Create Security Groups for Jenkins, Nexus, and SonarQube
- The Security Groups configuration for Jenkins, Nexus and SonarQube are listed below.
Jenkins Security Group
Name: jenkins-SG
Allow: SSH from MyIP
Allow: 8080 from Anywhere IPv4 and IPv6
Nexus Security Group
Name: nexus-SG
Allow: SSH from MyIP
Allow: 8081 from MyIP and Jenkins-SG
- SonarQube Security Group
Name: sonar-SG
Allow: SSH from MyIP
Allow: 80 from MyIP and Jenkins-SG
After this configuration, add another entry to Jenkins Inbound rule to Allow access on 8080 from sonar-SG. We added this extra configuration so that Sonarqube will send reports back to Jenkins.
Create EC2 instances for our Backend Services -(Jenkins, Nexus and SonarQube)
Jenkins Server Setup
- Create
Jenkins-serverwith the following configuration and userdata script below.
Name: jenkins-server
AMI: Ubuntu 20.04
SecGrp: jenkins-SG
InstanceType: t2.small
KeyPair: vprofile-ci-key
Additional Details: userdata below

#!/bin/bash
sudo apt update
sudo apt install openjdk-11-jdk -y
sudo apt install maven -y
curl -fsSL https://pkg.jenkins.io/debian-stable/jenkins.io.key | sudo tee \
  /usr/share/keyrings/jenkins-keyring.asc > /dev/null
echo deb [signed-by=/usr/share/keyrings/jenkins-keyring.asc] \
  https://pkg.jenkins.io/debian-stable binary/ | sudo tee \
  /etc/apt/sources.list.d/jenkins.list > /dev/null
sudo apt-get update
sudo apt-get install jenkins -y
###
Nexus Server Setup.
Name: nexus-server
AMI: Amazon Linux-2
InstanceType: t2.medium
SecGrp: nexus-SG
KeyPair: vprofile-ci-key
Additional Details: userdata below

#!/bin/bash
yum install java-1.8.0-openjdk.x86_64 wget -y
mkdir -p /opt/nexus/
mkdir -p /tmp/nexus/
cd /tmp/nexus/
NEXUSURL="https://download.sonatype.com/nexus/3/latest-unix.tar.gz"
wget $NEXUSURL -O nexus.tar.gz
EXTOUT=`tar xzvf nexus.tar.gz`
NEXUSDIR=`echo $EXTOUT | cut -d '/' -f1`
rm -rf /tmp/nexus/nexus.tar.gz
rsync -avzh /tmp/nexus/ /opt/nexus/
useradd nexus
chown -R nexus.nexus /opt/nexus
cat <<EOT>> /etc/systemd/system/nexus.service
[Unit]
Description=nexus service
After=network.target

[Service]
Type=forking
LimitNOFILE=65536
ExecStart=/opt/nexus/$NEXUSDIR/bin/nexus start
ExecStop=/opt/nexus/$NEXUSDIR/bin/nexus stop
User=nexus
Restart=on-abort

[Install]
WantedBy=multi-user.target
EOT
echo 'run_as_user="nexus"' > /opt/nexus/$NEXUSDIR/bin/nexus.rc
systemctl daemon-reload
systemctl start nexus
systemctl enable nexus
Sonar Setup
Name: sonar-server
AMI: Ubuntu 18.04
InstanceType: t2.medium
SecGrp: sonar-SG
KeyPair: vprofile-ci-key
Additional Details: userdata below

#!/bin/bash
cp /etc/sysctl.conf /root/sysctl.conf_backup
cat <<EOT> /etc/sysctl.conf
vm.max_map_count=262144
fs.file-max=65536
ulimit -n 65536
ulimit -u 4096
EOT
cp /etc/security/limits.conf /root/sec_limit.conf_backup
cat <<EOT> /etc/security/limits.conf
sonarqube   -   nofile   65536
sonarqube   -   nproc    409
EOT
sudo apt-get update -y
sudo apt-get install openjdk-11-jdk -y
sudo update-alternatives --config java
java -version
sudo apt update
wget -q https://www.postgresql.org/media/keys/ACCC4CF8.asc -O - | sudo apt-key add -
sudo sh -c 'echo "deb http://apt.postgresql.org/pub/repos/apt/ `lsb_release -cs`-pgdg main" >> /etc/apt/sources.list.d/pgdg.list'
sudo apt install postgresql postgresql-contrib -y
#sudo -u postgres psql -c "SELECT version();"
sudo systemctl enable postgresql.service
sudo systemctl start  postgresql.service
sudo echo "postgres:admin123" | chpasswd
runuser -l postgres -c "createuser sonar"
sudo -i -u postgres psql -c "ALTER USER sonar WITH ENCRYPTED PASSWORD 'admin123';"
sudo -i -u postgres psql -c "CREATE DATABASE sonarqube OWNER sonar;"
sudo -i -u postgres psql -c "GRANT ALL PRIVILEGES ON DATABASE sonarqube to sonar;"
systemctl restart  postgresql
#systemctl status -l   postgresql
netstat -tulpena | grep postgres
sudo mkdir -p /sonarqube/
cd /sonarqube/
sudo curl -O https://binaries.sonarsource.com/Distribution/sonarqube/sonarqube-8.3.0.34182.zip
sudo apt-get install zip -y
sudo unzip -o sonarqube-8.3.0.34182.zip -d /opt/
sudo mv /opt/sonarqube-8.3.0.34182/ /opt/sonarqube
sudo groupadd sonar
sudo useradd -c "SonarQube - User" -d /opt/sonarqube/ -g sonar sonar
sudo chown sonar:sonar /opt/sonarqube/ -R
cp /opt/sonarqube/conf/sonar.properties /root/sonar.properties_backup
cat <<EOT> /opt/sonarqube/conf/sonar.properties
sonar.jdbc.username=sonar
sonar.jdbc.password=admin123
sonar.jdbc.url=jdbc:postgresql://localhost/sonarqube
sonar.web.host=0.0.0.0
sonar.web.port=9000
sonar.web.javaAdditionalOpts=-server
sonar.search.javaOpts=-Xmx512m -Xms512m -XX:+HeapDumpOnOutOfMemoryError
sonar.log.level=INFO
sonar.path.logs=logs
EOT
cat <<EOT> /etc/systemd/system/sonarqube.service
[Unit]
Description=SonarQube service
After=syslog.target network.target
[Service]
Type=forking
ExecStart=/opt/sonarqube/bin/linux-x86-64/sonar.sh start
ExecStop=/opt/sonarqube/bin/linux-x86-64/sonar.sh stop
User=sonar
Group=sonar
Restart=always
LimitNOFILE=65536
LimitNPROC=4096

[Install]
WantedBy=multi-user.target
EOT
systemctl daemon-reload
systemctl enable sonarqube.service
#systemctl start sonarqube.service
#systemctl status -l sonarqube.service
apt-get install nginx -y
rm -rf /etc/nginx/sites-enabled/default
rm -rf /etc/nginx/sites-available/default
cat <<EOT> /etc/nginx/sites-available/sonarqube
server{
    listen      80;
    server_name sonarqube.groophy.in;
    access_log  /var/log/nginx/sonar.access.log;
    error_log   /var/log/nginx/sonar.error.log;
    proxy_buffers 16 64k;
    proxy_buffer_size 128k;
    location / {
        proxy_pass  http://127.0.0.1:9000;
        proxy_next_upstream error timeout invalid_header http_500 http_502 http_503 http_504;
        proxy_redirect off;

        proxy_set_header    Host            \$host;
        proxy_set_header    X-Real-IP       \$remote_addr;
        proxy_set_header    X-Forwarded-For \$proxy_add_x_forwarded_for;
        proxy_set_header    X-Forwarded-Proto http;
    }
}
EOT
ln -s /etc/nginx/sites-available/sonarqube /etc/nginx/sites-enabled/sonarqube
systemctl enable nginx.service
#systemctl restart nginx.service
sudo ufw allow 80,9000,9001/tcp
echo "System reboot in 30 sec"
sleep 30
reboot
Post Installation Steps
For Jenkins Server:
ssh into the Jenkins server and ensure that it is working by using the following commands. `systemctl status jenkins
Get the initial Admin password from the directory
/var/lib/jenkins/secrets/initialAdminPassword
sudo -i
system status jenkins
cat /var/lib/jenkins/secrets/initialAdminPassword
Visit your browser, http://<public_ip_of_jenkins_server>:8080 and enter the Administrator Password you got from your Jenkins server.

Install the plugins below for Jenkins
Maven Integration
Github Integration
Nexus Artifact Uploader
SonarQube Scanner
Slack Notification
Build Timestamp
Nexus Server
SSH into your Nexus server, and check if your server is running.
Go to your browser, and sign in at http://<public_ip_of_nexus_server>:8081. The initial Password will be located in /opt/nexus/sonatype-work/nexus3/admin.password
cat /opt/nexus/sonatype-work/nexus3/admin.password
The username is
admin, paste the password from the previous step.Setup new password and select
Disable Anonymous AccessSelect the gear symbol and create the repository on the Nexus repo.
This repo will be used to store our release artifacts.
maven2 hosted
Name: vprofile-release
Version policy: Release
- Next, create a maven2 proxy repository. Maven will store her dependencies in this repository, and Nexus will download it whenever we need any dependency for our projects.
maven2 proxy
Name: vpro-maven-central
remote storage: https://repo1.maven.org/maven2/
- Next, we create another maven2 hosted repo. This repo will be used to store our snapshot artifacts.
maven2 hosted
Name: vprofile-snapshot
Version policy: Snapshot
- The next repo we will create is the
maven2 grouptype. We will use this repo to group all maven repositories in our Nexus repository.
maven2 group
Name: vpro-maven-group
Member repositories:
 - vpro-maven-central
 - vprofile-release
 - vprofile-snapshot

For SonarQube Server:
- Go to browser, http://<public_ip_of_sonar_server>, and login with username
adminand passwordadmin.
Create a repository in GitHub
Create a private repository in Github to be used with this project.
The content will be cloned from the link below:
git clone -b ci-jenkins git@github.com:obusorezekiel/vprociproject.git
Build Job with Nexus Repo
We will be building Artifact from Source Code using Maven. On our Jenkins server, we will install JDK8 and Maven on Jenkins to successfully complete this job.
Since our application is using JDK8, we need to install Java8 in Jenkins. Navigate to the
Manage Jenkins->Global Tool ConfigurationWe will install JDK8 manually, and specify its PATH in here.
Under JDK -> Add JDK
Name: OracleJDK8
untick Install Automatically
JAVA_HOME: < we will get after next step >
- Currently, our Jenkins has JDK-11 installed, SSH into the Jenkins server, and install JDK-8. After installation
JAVA_HOMEJDK-8 PATH becomes/usr/lib/jvm/java-8-openjdk-amd64
sudo apt update -y
sudo apt install openjdk-8-jdk -y
sudo -i
ls /usr/lib/jvm
### we should get both jdk-11 and jdk-8 in this path ###
java-1.11.0-openjdk-amd64  java-11-openjdk-amd64  openjdk-11
java-1.8.0-openjdk-amd64   java-8-openjdk-amd64
- Next we will set up our Maven on Jenkins.
Name: MAVEN3
version : keep same
- Add Nexus login credentials to Jenkins. Go to
Manage Jenkins->Manage Credentials->Global->Add Credentials
username: admin
password: <pwd_setup_for_nexus>
ID: nexuslogin
description: nexuslogin
- Create Jenkinsfile for the Build pipeline with the code below.
pipeline {
    agent any
    tools {
        maven "MAVEN3"
        jdk "OracleJDK8"
    }

    environment {
        SNAP_REPO = 'vprofile-snapshot'
        NEXUS_USER = 'admin'
        NEXUS_PASS = 'admin123'
        RELEASE_REPO = 'vprofile-release'
        CENTRAL_REPO = 'vpro-maven-central'
        NEXUSIP = '172.31.11.249'
        NEXUSPORT = '8081'
        NEXUS_GRP_REPO = 'vpro-maven-group'
        NEXUS_LOGIN = 'nexuslogin'
        SONARSERVER = 'sonarserver'
        SONARSCANNER = 'sonarscanner'
        NEXUSPASS = credentials('nexuspass')
    }

    stages {
        stage('Build'){
            steps {
                sh 'mvn -s settings.xml -DskipTests install'
            }
            post {
                success {
                    echo "Now Archiving."
                    archiveArtifacts artifacts: '**/*.war'
                }
            }
    }
}
- Let’s create a New Job in Jenkins with the properties below:
Pipeline from SCM
Git
URL: <url_from_project> I will use SSH link
Crdentials: we will create github login credentials
#### add Jenkins credentials for github ####
Kind: SSH Username with private key
ID: githublogin
Description: githublogin
Username: git
Private key file: paste your private key here
#####
Branch: */ci-jenkins
path: Jenkinsfile
- Login to the Jenkins server via SSH and complete the host-key checking step. Execute the command blow, to store our host key in
.ssh/known_hostsfile.
sudo -i
sudo su - jenkins
git ls-remote -h -- git@github.com:obusorezekiel/vprociproject.git HEAD
- Now it's Build time. Our build pipeline is successful!
Setup GitHub Webhook, and work on the Jenkins Job
In this step, we will add a webhook to our github repository.
Go to GitHub repository,
Settings->Webhooks-> AddJenkinsURLwith/github-webhook/at the end. We are doing this so that after a new commit is made the build pipeline will be triggered automatically.Go to Jenkins and add the configuration below to our
vprofile-ci-pipelinejob.
Build Trigger: GitHub hook trigger for GITScm polling
- Our job is triggered automatically after
git push. And build is successful.

Code Analysis with SonarQube
When installing SonarQube, Set-Up These two Things:
SonarScanner tool in Jenkins to scan the code
We need SonarQube information in Jenkins so that Jenkins will know where to upload these reports
First, we’d configure the SonarQube Scanner tool configuration. Go to
Manage Jenkins->Global Tool Configuration
Add sonar scanner
name: sonarscanner
tick install automatically
- Go to
Configure System, find theSonarQube serverssection
tick environment variables
Add sonarqube
Name: sonarserver
Server URL: http://<private_ip_of_sonar_server>
Server authentication token: we need to create token from sonar website
- Add our sonar token to global credentials.
Kind: secret text
Secret: <paste_token>
name: sonartoken
description: sonartoken
- Add sonarQube code for our pipeline and commit/push changes to GitHub.
##new environment variables to be added to environment##
SONARSERVER = 'sonarserver'
SONARSCANNER = 'sonarscanner'
##new stages to be added##
 stage('CODE ANALYSIS with SONARQUBE') {

          environment {
             scannerHome = tool "${SONARSCANNER}"
          }
          steps {
            withSonarQubeEnv("${SONARSERVER}") {
               sh '''${scannerHome}/bin/sonar-scanner -Dsonar.projectKey=vprofile \
                   -Dsonar.projectName=vprofile-repo \
                   -Dsonar.projectVersion=1.0 \
                   -Dsonar.sources=src/ \
                   -Dsonar.java.binaries=target/test-classes/com/visualpathit/account/controllerTest/ \
                   -Dsonar.junit.reportsPath=target/surefire-reports/ \
                   -Dsonar.jacoco.reportsPath=target/jacoco.exec \
                   -Dsonar.java.checkstyle.reportPaths=target/checkstyle-result.xml'''
            }
          }
Our job turned out successful.
View quality gate results in the SonarQube server.
We can also create our own Quality Gates for our project as well.
Next, we will create a Webhook in SonarQube to send the analysis of the results to Jenkins.

http://<private_ip_of_jenkins>:8080/sonarqube-webhook
- We will add the stage below to our pipeline and commit changes to Github.
stage('QUALITY GATE') {
            steps {
                timeout(time: 10, unit: 'MINUTES') {
               waitForQualityGate abortPipeline: true
            }
            }
}
- BUILD is successful!
Publishing Artifact to Nexus Repo
Here, we will automate the process of publishing the latest artifacts to our Nexus repository after a successful build.
Build-Timestamp is added to the artifact name to get a unique artifact each time.
Go to
Manage Jenkins->Configure SystemunderBuild Timestampand update to preference.
yy-MM-dd_HHmm
- Add the stage below to your pipeline and view results.
stage('UPLOAD ARTIFACT') {
                steps {
                    nexusArtifactUploader(
                        nexusVersion: 'nexus3',
                        protocol: 'http',
                        nexusUrl: "${NEXUSIP}:${NEXUSPORT}",
                        groupId: 'QA',
                        version: "${env.BUILD_ID}-${env.BUILD_TIMESTAMP}",
                        repository: "${RELEASE_REPO}",
                        credentialsId: ${NEXUS_LOGIN},
                        artifacts: [
                            [artifactId: 'vproapp' ,
                            classifier: '',
                            file: 'target/vprofile-v2.war',
                            type: 'war']
                        ]
                    )
                }
        }
The build is successful.
The artifact is uploaded to the Nexus repository.
Slack Notification
Login to slack and create a workspace by following the prompts. Then create a channel
jenkins-cicdin our workspace.Next, add jenkins app to slack.
Choose channel
jenkins-cicd. It will give us to setup instructions, from there copyIntegration token credential ID.Go to Jenkins dashboard
Configure system->Slack
Workspace:  example (in the workspace url example.slack.com)
credential: slacktoken
default channel: #jenkins-cicd
- Add your sonar token to global credentials.
Kind: secret text
Secret: <paste_token>
name: slacktoken
description: slacktoken
- Add slack notification code and push our changes.
post{
        always {
            echo 'Slack Notifications'
            slackSend channel: '#jenkinscicd',
                color: COLOR_MAP[currentBuild.currentResult],
                message: "*${currentBuild.currentResult}:* Job ${env.JOB_NAME} build ${env.BUILD_NUMBER} \n More info at: ${env.BUILD_URL}"
        }
    }
- We get our Notification from slack.

Setup Branches and Webhook
- To begin our Continous Delivery process, we will create a new branch from
ci-jenkinsbranch and call it ascicd-jenkinsbranch.
git checkout ci-jenkins
git checkout -b cicd-jenkins
- Go to the
dockerbranch from the repository below and download as zip file, add it to your source code in your local repository forcicd-jenkinsbranch.
https://github.com/obusorezekiel/vprociproject
- Create two new directories and copy your Jenkinsfile to both of them. Write StagePipeline and ProdPipeline.
mkdir StagePipeline/ ProdPipeline/
cp Jenkinsfile StagePipeline/
cp Jenkinsfile ProdPipeline/
git rm Jenkinsfile
- Add our files and the new branch to GitHub.
git add .
git commit -m "preparing cicd-jenkins branch"
git push origin cicd-jenkins
Setup IAM User & ECR
Create an IAM user for Jenkins with Programmatic access keys and add managed policies.
Create a Private ECR repository for Docker images named as
vprofileappimg.

Jenkins Configurations
- Download the plugins below to Jenkins.
Docker Pipeline
CloudBees Docker build and Publish
Amazon ECR
Pipeline: AWS Steps
Add AWS Credentials to the Global Credentials of Jenkins, choose AWS Credentials, and provide the Access key and Secret key ID.
Lastly, ssh into your Jenkins server and install docker. Follow the documentation for installation steps
https://docs.docker.com/engine/install/ubuntu/
sudo su - jenkins
usermod -aG docker jenkins
id jenkins
systemctl restart jenkins
Docker Build in Pipeline
- We will add below env variables and stages to the
JenkinsfileunderStagePipelinedirectory.
#### 3 new environment variables ####
         registryCredential = 'ecr:us-east-1:awscreds'
        appRegistry = '392530415763.dkr.ecr.us-east-1.amazonaws.com/vprofileappimg'
        vprofileRegistry = "https://392530415763.dkr.ecr.us-east-1.amazonaws.com"
################################
    stage('Build App image'){
            steps{
                script{
                  dockerImage = docker.build( appRegistry + ":$BUILD_NUMBER", "./Docker-files/app/multistage/")
                }
            }
        }
        stage('Upload App Image'){
            steps{
                script{
                    docker.withRegistry( vprofileRegistry, registryCredential ) {
                        dockerImage.push("$BUILD_NUMBER")
                        dockerImage.push('latest')
                    }
                }
            }
        }
Commit/push changes to our GitHub repository.
Create a new pipeline in Jenkins.
Name: vprofile-cicd-pipeline-docker
Type: Pipeline
Build Trigger : GitSCM polling
Pipeline from SCM
URL : SSH url from GitHub
crdentials: githublogin
branch: cicd-jenkins
ScriptPath: StagePipeline/Jenkinsfile
- Our Docker pipeline is successful and image uploaded to ECR repository.
AWS ECS Setup
Create ECS Cluster for Staging environment.
Create a Task definition to create our app containers.
Name: vproappstagetask
containerName: vproapp
Port: 8080
Image URI: paste from ECR
Environment: Fargate 1 vCPU, 2 GB memory
- Create service now.
Name:  vproappstagesvc
Replica: 1
task definition: vproappstagetask
LoadBalancer: create new
target group vproappstagetg HTTP 80
secGrp: vproappstagesg
HTTP 80
Health check: /login
Grace period: 30
Update port to 8080 in both the Target group and Security group.
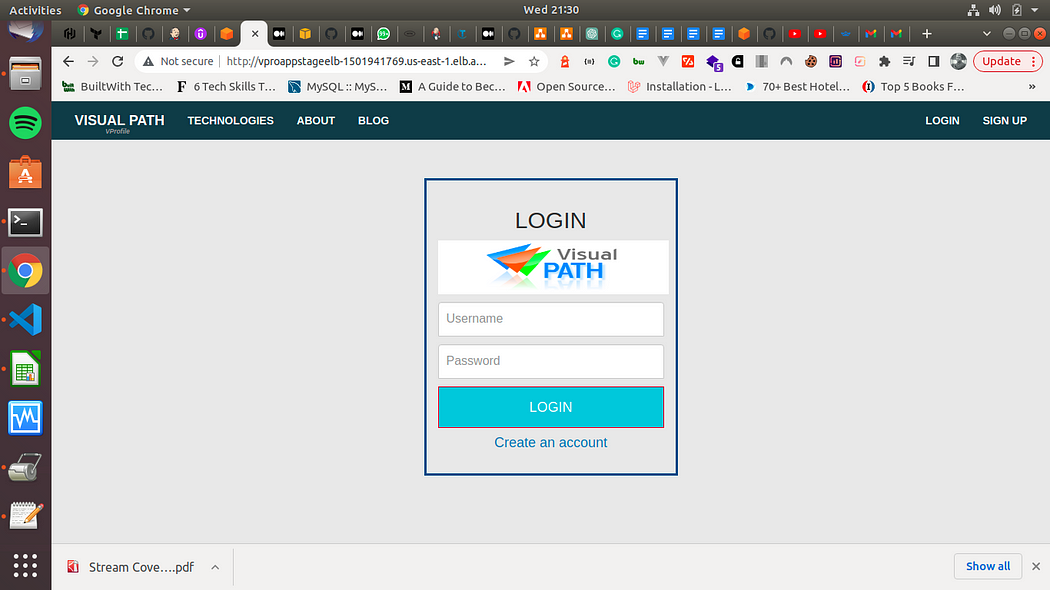
Our service is running, check the app from the browser using the ALB url.

Pipeline for ECS
- Add deploy stage to Jenkinsfile along with two new variables. Commit/push changes to GitHub and this should trigger our pipeline automatically.
###### new environment variables ####
cluster = "vprostaging"
service = "vproappstagesvc"
########################
stage('Deploy to ECS Staging') {
                steps {
                    withAWS(credentials: 'awscreds', region: 'us-east-1') {
                        sh 'aws ecs update-service --cluster ${cluster} --service ${service} --force-new-deploymnet'
                    }
                }
        }
Our pipeline is complete.
Notification sent to Slack.
We can see the application is running from ECS.